Showing posts with label recipes. Show all posts

Friday, September 16, 2016

Pumpkin Baked Oatmeal


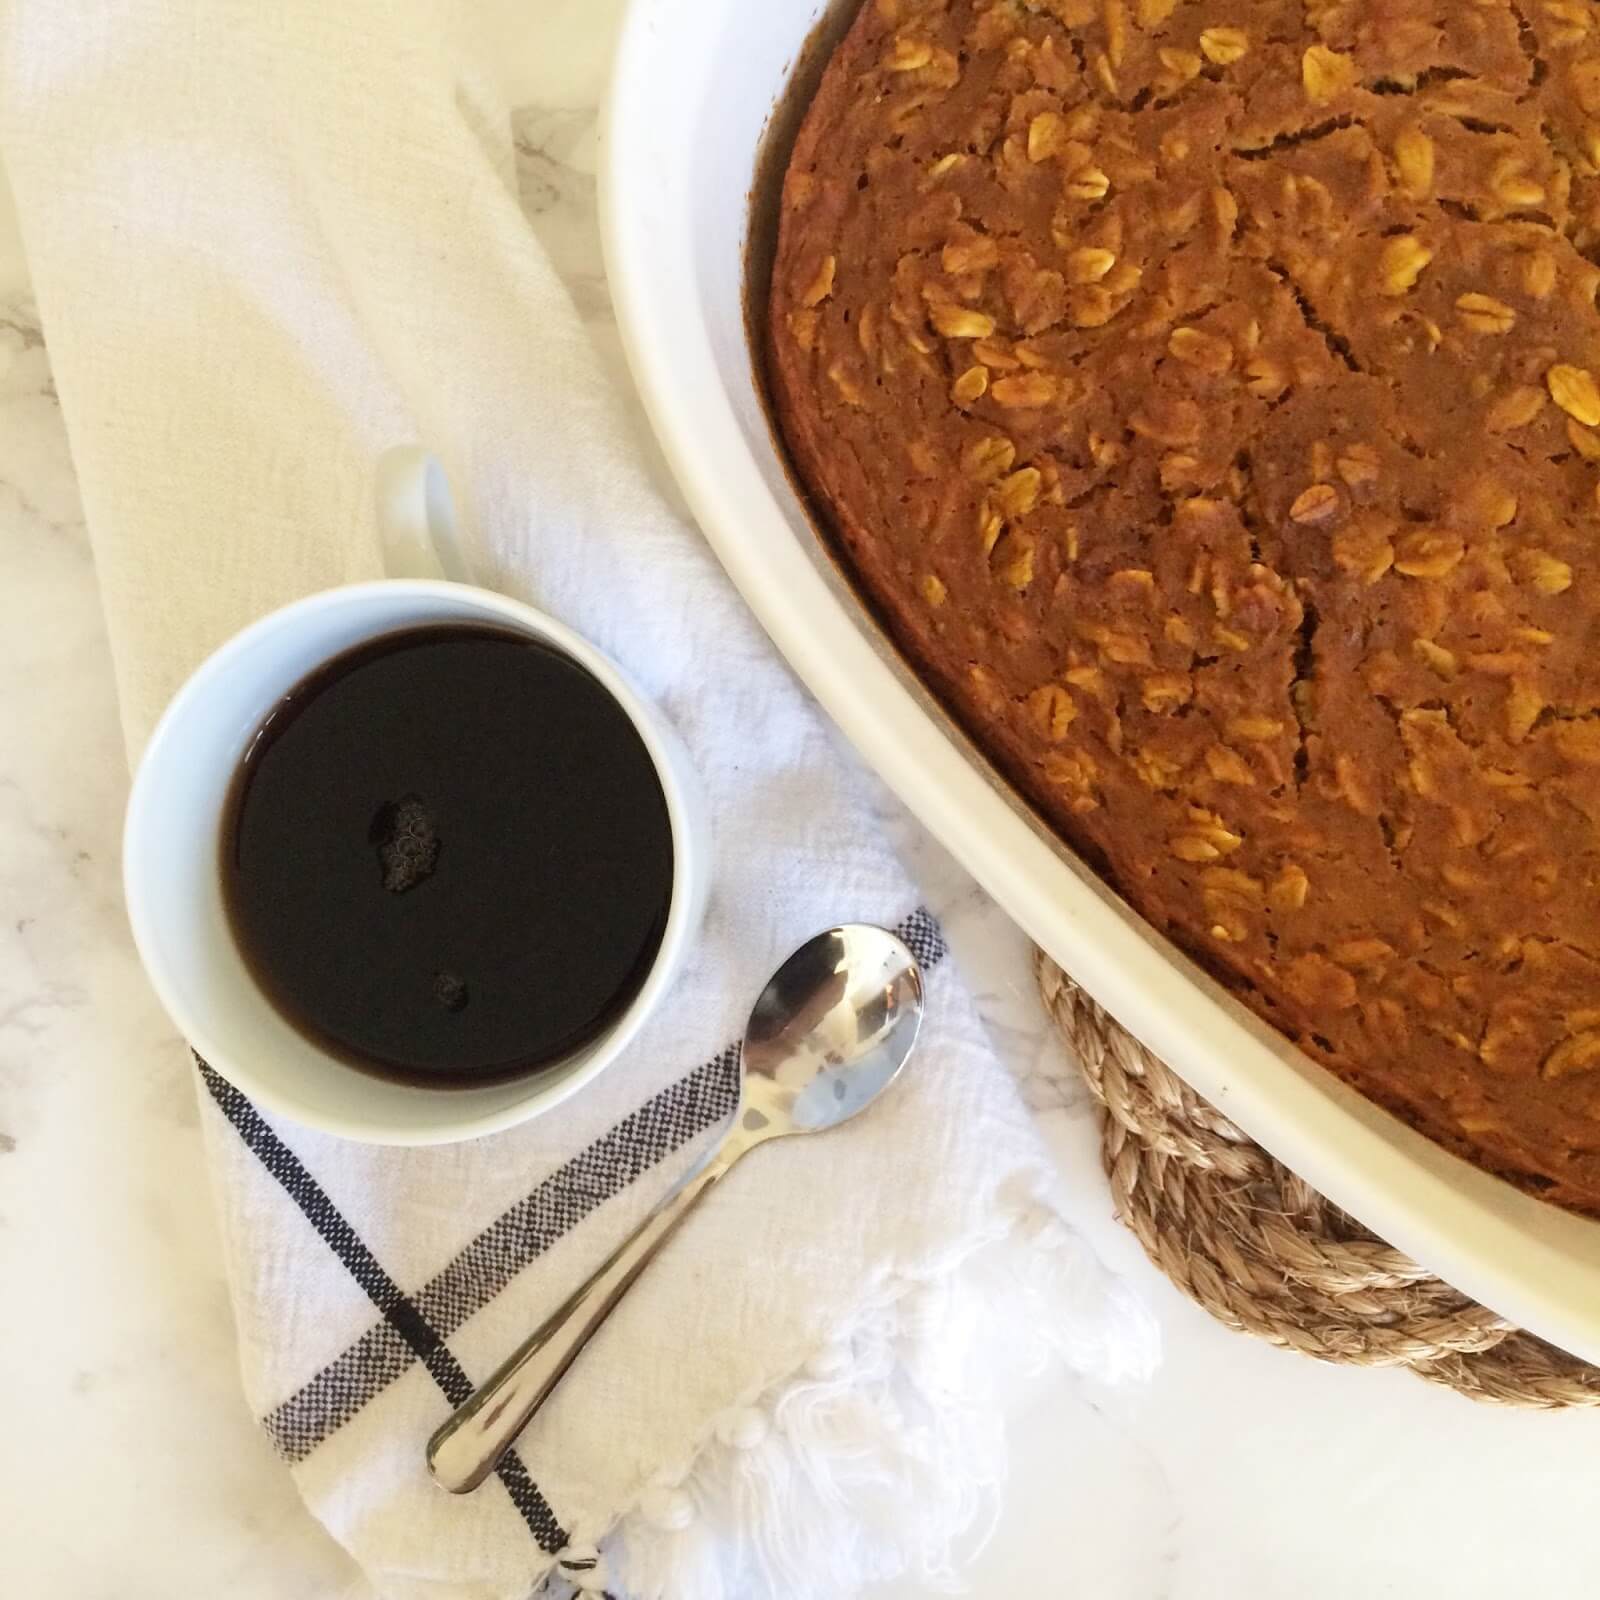
The mornings have been wonderfully crisp the past few days and just begging for a warm breakfast. I've been itching to make baked oatmeal after having it at a girlfriends house for brunch.  It's cake-like, but much healthier! 

There are many versions of baked oatmeal, but I couldn't resist making it with pumpkin to welcome the fall season.  It made the house smell incredible and it was sooo good that we made it twice this week.  I'm sure that I'll be experimenting with other flavor combinations soon. We ate it warm the first day, but it can keep in the fridge for up to 5 days and also be enjoyed at room temperature.  It's a great make-ahead breakfast you can enjoy all week.  Having something healthy pre-made on busy mornings makes me so happy. 

The pumpkin baked oatmeal is 100% toddler approved! It was not only easy and fun for James Robert to help me make, but he gobbled it up every morning this week without knowing how healthy it is! And I love it because it feels indulgent and keeps me satisfied well into the morning.  

Pumpkin Baked Oatmeal Recipe:
(adapted from Apple of My Eye)

Ingredients:
2 1/4 cup old fashion oats (you can use quick cook, but decrease cooking time)
1 teaspoon baking powder
1 teaspoon cinnamon
1/2 teaspoon nutmeg (or pumpkin pie spice)
1/2  teaspoon salt
1/3 cup brown sugar lightly packed
1 1/2 cups of milk
1 15oz can of pumpkin puree
1 egg
1 tablespoon vanilla extract
3 tablespoons honey
2 tablespoons chia seeds

Directions:
1) Preheat oven to 375 degrees
2) In a large bowl mix together the dry ingredients (oats, baking powder, cinnamon, nutmeg, salt and brown sugar, chia seeds)
3) In a separate bowl whisk together the wet ingredients (milk, pumpkin, egg, vanilla, honey)
4) Add wet ingredients to dry and mix until incorporated
5) Pour into a greased 2 quart baking dish 
6) Bake for 50-60 minutes 

P.S.  My other favorite slow cooker overnight oatmeal recipe is here

Wednesday, June 22, 2016

Oatmeal Chocolate Chip Lactation Cookies (aka what to bring a new Mama)

We aren't quite settled into a new routine yet, but have been savouring this newborn phase as much as possible. I am loving all of Thomas' snuggles and new baby sounds; he's just so little! Besides recovering from delivery, the most challenging part of being a new Mom again is breastfeeding around the clock.  It certainly is easier the second time around, but it still surprises me how all-encompassing and worrisome it can be to make sure that everything is going well. That's why these lactation cookies are my favorite little treat.

When James Robert was born, my sister in law lovingly made me a tin of these cookies and I remember them fondly.  The best part about lactation cookies is not having to share-- having a little dessert all to myself is an indulgence that I look forward to each day!

These lactation cookies are made with brewers yeast and oats to help support your milk supply.  I supplemented the original recipe by adding dried cherries and chocolate chips (feel free to omit if you dare).  A week or so before my due date, I made a batch of this dough and portioned it out into balls and froze them.

Now I can just pull out a few and pop them in the oven in order to have fresh cookies everyday.  Lactation cookies are the perfect treat to gift yourself or a new mama!

Oatmeal Chocolate Chip Lactation Cookies

Ingredients:
1 cup butter
1 cup sugar
1 cup brown sugar
4 tablespoons water
2 tablespoons of flax seed meal
2 eggs
1 teaspoon vanilla
2 cups flour
1 teaspoon baking soda
1 teaspoon salt
3 cups old fashion oats
1 cup chocolate chips
2-4 tablespoons brewers yeast
1/2 cup- 1 cup of dried cherries, cranberries and/or nuts

Directions:
1) Preheat oven to 350 degrees.
2) Mix the flax seed meal and water and let sit for 5 minutes.
3) Beat butter and both sugars until fluffy then add eggs and beat.
4) Add flaxseed and vanilla and mix well.
5) Sift the flour, baking soda, salt and brewers yeast together.
6) Add dry ingredients to butter mixture, once well mixed add in oats and chips + dried fruit or nuts.
7) Scoop onto baking sheet and bake for 12 minutes.

Wednesday, June 1, 2016

Summer Chicken Salad Recipe

This chicken salad was a happy accident in experimentation.  Summer has revived my cooking enthusiasm which got me playing with one of our go-to meals this time of year.  I discovered the  combination of dill, shallot and tart dried cranberries are wonderful!
One bite and Mat urged me to write it down.  Otherwise, I'm prone forget how to recreate. The good news is that chicken salad, in almost all permutations, is delicious; feel free to use what I've listed below or ad lib a bit.  We've been serving ours in lettuce boats, but it's equally good in a traditional sandwich or croissant! As noted below, I like to use poached chicken breasts versus rotisserie to cut back on the sodium, but both are great.  Here are guidelines for our new favorite variation: 

Summer Chicken Salad: 
Ingredients: 
2-3 chicken breasts (or rotisserie chicken)
1 bay leaf
2-3 tablespoons of dill, chopped
1/4 cup of mayo
1 shallot diced
1/4 cup toasted pecans, chopped
1/4 cup dried cranberries or cherries
salt and pepper


Directions:
1) Boil the chicken breast for about 20 minutes with a bay leaf and a pinch of salt.  When cooled, shred into desired pieces.
2) Add in the remaining ingredients and mix well.

Wednesday, May 25, 2016

Ricotta and Lemon Bruschetta Recipe

This past weekend kicked off summer in Canada with Victoria Day celebrations which got my wheels turning about some of my go-to recipes for the season.  Year after year, Ricotta and Lemon Bruschetta has been one of my favorite things to serve.  It's light flavors and easy preparation make it ideal for this time of year if you're entertaining or taking it along to a party.  

Thank you to Her View From Home for sharing my recipe over on their blog this week.  Hop on over to get the easy instructions!  For my friends in the states, this would be the perfect take-along to any of your weekend festivities; people gobble it up! 

Wednesday, May 18, 2016

Watermelon and Strawberry Homemade Popsicles

There has been a constant supply of watermelon in my refrigerator over the past couple weeks; I can't get enough!  I think it may be my biggest pregnancy craving of all. I've been adding it to my water to infuse the flavor, eating it by the bowl full and most recently making these watermelon and strawberry popsicles.

If watermelon doesn't scream summertime, I don't know what does. And with Memorial Day in the not-too distant future, these could be a great addition to a BBQ.

If you follow me on snapchat (meg_leanderson), you saw that I was experimenting with some homemade popsicle recipes.  James Robert has been begging to make them, so with all my watermelon in the fridge, I thought it would be the perfect time to try!

I've been pinning away homemade popsicle ideas, but ultimately went with the easiest and healthiest version I could find- this requires only 3 ingredients and they are lower in sugar than most which make them a treat I feel good about giving and enjoying myself.


We used watermelon, strawberries and a little bit of maple syrup for sweetening.  Mix that all up in a blender (I love our ninja) and then pour into your desired molds.

Recipe: 
I don't have precise measurements for this, but that was the beauty, you really don't need them; you can't really mess this up!  For the small popsicle molds, I used about 2 cups of chopped watermelon (seedless) and about 1 cup of strawberries, hulled and about 2 tablespoons of maple syrup.

My mother-in-law found these popsicle molds at Ikea, which I really like because they are the perfect size for toddlers (not too big).  But I also have my eyes on a set of these; we received one from a birthday party gift bag and they are also a good size plus really cute!


PS.  I have updated my recipe index with the most recent recipes here

Wednesday, May 4, 2016

Easy Recipes for a Cinco de Mayo Fiesta at Home

Mat makes award winning guacamole; family begs him to make it at all of our get togethers.  The stuff of legend, or so we like to think.   There are few times that he teaches me things in the kitchen, but this is one of them.

This past weekend we couldn't wait for Cinco De Mayo to get our fill of Mexican. Since Mexican food is hard to come by in Canada, we have taken to making our own at home frequently (and importing our own enchilada sauce and fixings when we come back from the states). We took advantage of our one day of sunshine over the weekend to grill, make tacos and pretend we live somewhere warmer!

We've been battling the weather recently.  Cool temps and lots of rain this spring have been such a bummer, but this little guy helps to keep me smiling.  He has taken to his toy camera and I can't imagine where he gets that from?

If you're looking to make your own Cinco De Mayo feast at home, these are some of our favorite easy and healthy recipes, including Mat's guac secrets!!

Mat's Guacamole:
2 ripe avocados
2-3 tablespoons of finely diced onion
2-3 tablespoons of finely diced cilantro
1/2 of a tomato diced (without seeds)
salt and lime juice to taste

Preparation tips: if you have a molcajete, use that to macerate the onion and cilantro into a paste then add the rest of the ingredients.  If not, use the back of a spoon to do the same in a regular bowl.

Cilantro Lime Grilled Chicken tacos with grilled peppers and onions.  We like to top ours with greek yogurt spiked with lime zest and juice along with some lettuce and guac.  A side of grilled pineapple is another favorite!


The best and easiest way to finish the meal is with my riff on a weight watchers cake.  Three ingredients!  I love this cake anytime I want to indulge my sweet tooth without sacrificing too many calories.  It seemed like a good pairing for our Mexican dinner but could also be prefect for Mother's Day too!

3 Ingredient Pineapple and Coconut Angelfood Cake:   Preheat oven to 350 degrees F.  Mix in a bowl one package of angel food cake, 10 oz of crushed pineapple and about 1/2 cup of shredded coconut (totally optional).  No need to grease the pan.  Pour mixture into an angel food cake pan or 13 x 9 dish and bake for about 30-40 minutes or until a toothpick comes out clean. 

Top this all off with a few margarita's (even if they are sans alcohol) and you've got a party!  

Wednesday, April 27, 2016

Easy DIY All-Purpose and Antibacterial Cleaner

Within the past few weeks,  we have been dealing with strep throat, hand foot and mouth and then there was a breakout of fifths disease at James Robert's school (I had never heard of this before)!  It's so hard to be pregnant and care for a sick family;  I fought wanting to help, but wanting to protect myself (apparently fifths disease can be dangerous for pregnant women).

So needless to say, I've in de-germ mode around here.  Thankfully, everyone is feeling better, but this cleaner is still something I use daily to swipe our most-touched surfaces.  I shared this "recipe" on snapchat recently (meg_leanderson) and got a few questions, so I thought I'd answer them here.

I never thought I would be the type to make my own cleaner, but after making this once I was hooked.  The smell is so much better than anything I've ever bought from the store.

I'm also totally in love with the fact that it is safe and effective (the essential oils help kill germs).  It's a peace of mind to know you're spraying something that is safe with little one's around. There is something about knowing exactly goes in it that makes me feel great!
Recipe: 
2 Tablespoons of Castile Soap
10 drops of lemon essential oil
15 drops of thieves essential oil
fill the rest with water 

Notes: 
  • You'll want to use a glass bottle for mixing this cleaner because essential oils can leach into plastic.  I got mine from here
  • I love Dr. Bronners Castile Soap for so many things; you won't regret getting a bottle.
  • You can order Young Living Essential Oils here; I also recommend Lesley's site and resources.  

Wednesday, April 20, 2016

Swiss Museli to Celebrate Spring

This past weekend, we had our first sunshine and warm weather that felt like spring and it wasn't a moment too soon.  While the winter may have been mild by Canadian standards, it felt like it had been dragging on forever.  

Each year, right about this time, I crave the switch from warm breakfasts that we eat all winter to something satisfying but cold- Swiss Museli from Sophie Dahl's fantastic and seasonal cookbook, Voluptuous Delights, is perfection. 
For years, like clockwork, I pull out this book while the leaves are starting to bud on the trees and whip up our first batch.  It is really a simple recipe and very adaptable.  I'll leave you with the basic idea and allow you to experiment with your own favorite version.  My adaptation is below.  

Swiss Museli (adapted from Sophie Dahl)
Ingredients:
4 apples cored and shredded (I prefer granny smith or another substantially tart variety)
juice of half of a large lemon
2 cups of regular oats (don't use the quick oats for this recipe)
2 cups of regular yogurt (greek doesn't work well)
1/2 cup of dried fruit of your choice, our favorite is dried cherries, but raisins or even apricots are lovely
1/4 cup of chopped nuts (walnuts, pecans or almonds do the trick nicely)
agave or honey are optional as toppings as well as a smattering of fruit 

Directions: 
Peel, core and grate your apples into a large bowl.  Squeeze the lemon juice over the apple to prevent browning and add a zing.  Then mix in the remaining ingredients.  Best left overnight, the oats will soak in all the amazing flavor and then you're welcomed with a hearty and delicious breakfast.  

Wednesday, April 13, 2016

Easiest and Best Carrot Cake + A Birthday Celebration


Every year, I relish Mat's Birthday request to make carrot cake.  It's his most favorite dessert and a requisite treat to celebrate his Birthday.  There is something about homemade birthday cakes and cards that feel so special to me.  Especially when little hands add to the charm!
This year, James Robert even got into the festivities and helped me mix the cake.  He could barely wait until after dinner to light the candles and try a slice.  And since every year I find myself scratching my head about the precise ingredients, I decided that I needed to write it down here to remember for the years to follow!


Carrot cake from scratch can be daunting. But with trial and error, I've created a cheater's version that uses box mix + fresh ingredients that has become a treasured favorite recipe.  Not only is it much easier, but it could easily pass as being from scratch, especially when you top it with homemade cream cheese icing.

It was fun to watch James Robert get so excited to help Mat celebrate his Birthday and share in the carrot cake festivities.  We hope that Daddy has the best year yet!

Easiest and Best Carrot Cake + Cream Cheese Frosting
Cake Ingredients:
2 large eggs lightly beaten
1 (8oz) crushed pineapple, undrained
1 package of yellow cake mix (I used Duncan Hines)
1/3 cup of miracle whip
1 teaspoon cinnamon
dash of nutmeg
1 cup shredded carrots
approximately 1/2 cup of chopped pecans or walnuts

Directions:
lightly beat eggs then add the remaining ingredients in a large bowl.  Stir together until well mixed.  Pour into greased and floured 9" cake pans.  Bake at 350 degrees for 30 minutes or until a toothpick comes out clean.

Cream Cheese Frosting Ingredients:
8 oz of cream cheese
1 stick of butter (8 tablespoons)
1 cup of powdered sugar
1 teaspoon of vanilla extract

Directions:
Beat cream cheese and butter in a mixing bowl until smooth.  Add in powdered sugar and vanilla and continue beating until smooth.

Wednesday, March 30, 2016

Easy and Healthy Toddler Approved Meals (with veggies!)

I was recently talking with some girlfriends about the increasing distain our toddler's have for trying new foods.  Mealtime can be fraught with stress for many parents, especially when our little ones are asserting strong opinions about what they like and don't.

For us it seems to go in phases.  Sometimes James Robert is very picky and seems to only eat noodles and to be honest, some nights that's OK.   Usually, we'll try again the next day with something new; experimentation and variety have served us well.  And now that he is a little older, including him in the meal prep has been a HUGE win.  When his little hands get to help shred the cheese, mix or pour the ingredients or we call things by a fun name, he is much more enthusiastic about giving it a try.

With that in mind, I wanted to share some quick, easy dinner ideas that we have made in the past couple of weeks that had us all eating our veggies.  Follow along on Instagram where I will be sharing more in the future.

1) Everything but the kitchen sink crockpot veggie soup.  I literally throw in all my veggies, stock, chicken and it always turns out great.  You can add noodles.  We love ours with frozen okra thrown in at the end (JR's favorite veggie).   Adapted from this recipe.  
 
2) Chicken and veggie enchiladas are always a hit.  This is a family recipe that I can share in another post, but really it's so simple.  These have mushrooms, spinach and chicken as filling and I've discovered that the smaller I chop up the veggies in the filling, the more I can hide! 
 3) Zucchini boats were a recent win! JR helped to mix the ingredients and absolutely loved that they are called boats.  I cut his up into little pieces at the end and added extra cheese and he gobbled them up. I loosely used this recipe. 
4) Twice baked sweet potatoes filled with bean burger and topped with avocado, cheese and greek yogurt. I used this recipe. 
 
5) I couldn't get enough of these healthy buffalo chicken wraps, along with everyone else in the family.  I topped the tangy chicken with celery, greek yogurt and lots of broccoli slaw.  Adapted from this recipe. 
 
6) This isn't so much a recipe as a throw-together meal.  It may surprise you how much you like it and your little.  We've been trying to add fermented foods to our diet and have discovered a love for sauerkraut in the process (the kind that comes in the refrigerated section of WF). This sauerkraut is a ginger/carrot kind and is so delicious. Drain off excess liquid, add chopped apples and some cubes of cheese and it's a delicious meal. 

P.S. When all else fails, we make green smoothies.  They are still a huge favorite and a delicious, easy way to get JR to get his greens.

Wednesday, March 23, 2016

Blueberry and Lemon Breakfast Cake and Other Spring Happenings


To welcome the official start to spring this past weekend, I made a blueberry and lemon breakfast cake.  The combination of lemon and blueberries just seems to scream springtime!  Even the ingredient's make the kitchen cheery. 

While Canada does it's best to catch up on warmer temps, we've been doing our best to seek out spring in other ways.  A visit to a local tropical greenhouse full of blooming bulbs,  walks by the lake in the cold sunshine and making an Easter tree! 

We've been enjoying the blueberry and lemon breakfast cake all week and since it would also be a perfect addition to an Easter brunch or potluck, I wanted to share the recipe here.

I adapted this recipe from a favorite I found on pinterest ages ago (follow me here) from Alexandra Cooks.    I think buttermilk really is the key ingredient in this recipe; I have used both store bought and made my own and both work beautifully for this cake.

Blueberry and Lemon Breakfast Cake:
Ingredients:
1/2 cup (1 stick) butter, room temperature
zest from 1 large lemon
3/4 cup of sugar + 2 tbs for topping
1 egg, room temperature
1 teaspoon vanilla
2 cups of flour (set aside 1/4 cup to toss with blueberries)
2 teaspoons baking powder
1 teaspoon kosher salt
2 cups fresh blueberries
1/2 cup of buttermilk (to make homemake check out this link)

Directions:
1) Preheat oven to 350 degrees F
2) Cream together the butter, sugar and lemon zest until fluffy
3) Add egg and vanilla until well combine
4) In a separate bowl, toss the blueberries with 1/4 cup flour.  Then in another bowl, whisk together the rest of the flour, baking powder and salt
5) Add the flour mixture to the batter a little by little alternating with the buttermilk.  At the end, gently fold in the blueberries
6) Grease a 9" baking pan (I use a glass pie plate) with butter or coconut oil.  Spread batter in the pan and top with additional sugar
7) Bake for 35-45 minutes until toothpick is clean


Wednesday, February 17, 2016

Coconut Anzac Biscuits

I have a very eager sous chef and budding baker.  Mixing, measuring and pouring are some of James Robert's favorite activities; about once a week, he begs to put on his apron and help me bake something.

This past weekend's excessively cold weather (-20 without windchill!) was the perfect excuse to cozy up inside and bake coconut Anzac biscuits (cookies for my American, friends)!  I became enamoured with Anzac biscuits while living in New Zealand. They are ubiquitous in their cafes and pair perfectly with tea or coffee.

Originally, they were sent to the Anzac soldiers in WWI because they could be made without eggs and keep well in care packages.  Today, I appreciate the egg-free recipe for it lends it's self well to little hands who want to steal a lick of batter. Also, James Robert is allergic to eggs (that aren't baked) and peanuts, so this recipe is especially wonderful for us.


I turn away for one second and he's eating straight out of the bowl!

Coconut Anzac Biscuits: 
adapted from Averie Cooks

Ingredients: 
1/2 cup of butter, melted
1 cup brown sugar, packed
2 tablespoons honey
2 tablespoons syrup
1 cup all-purpose flour
1 cup old-fashioned oats (don't use quick oats)
3/4 cup sweetened shredded coconut, heaping
pinch of salt if using unsalted butter
2 tablespoons of boiling water
1 teaspoon baking soda

Directions:
1) Melt butter, then add the brown sugar, honey and maple syrup and stir to combine
2) Add flour, oats and coconut (and salt if using) then stir and set aside
3) In a small bowl, carefully add boiling water to baking soda and stir until baking soda is dissolved.  Use care as the mixture will bubble
4) Pour water mixture over the rest of batter and stir to combine.  The mixture will come together when pinched
5) Scoop about 2 tablespoons and shape into a ball and place on a cookie sheet.  Flatten slightly with palm (toddlers love this part) then cover with parchment or plastic wrap and refrigerate for at least 3 hours but up to a few days before baking
6) Pre-heat oven to 350 degrees F.  Line baking sheets with a silpat or spray or parchment paper.  Place cookies on sheet about 2 inches apart and bake for 9 minutes for perfectly chewy cookies.  They will not look "done" in the middle, but will have a slight golden brown to the sides- that's when they are done

This recipe makes a limited number of cookies, I think ours batch was about 12, so you may want to double.  Also, I found that letting the dough chill 3 hours vs overnight didn't make much of a difference.  The cookies are best after coming out of the oven and setting for about 10 minutes (if you can wait that long!)

Despite the chill of the weekend, it was just what I needed to hit the reset button.  February may be the shortest month, but it often feels longest to me.  Spending time together, eating cookies and laughing remains one of the surest ways to ban winter blahs. Hope you're staying warm too! 

Wednesday, February 10, 2016

DIY Sugar Lip Polish + Whipped Sugar Body Scrub

This pregnancy is flying by. I’m astonished that we’re over half way to meeting this baby boy and can hardly contain my excitement.  I’m also relishing every moment of the second trimester while I have energy and feel good! Looking back, my third trimester with James Robert was challenging- I had pregnancy induced arthritis and I generally didn’t feel great.  So this time around, I’m determined to take better care of myself-- a little pampering can go a long way, right?! 
Trouble with pampering is that it usually takes a lot of time and often I'm ready to crash at the end of the day.  But these two recipes proved to be a quick and easy pick-me-up with ample time leftover. 

The dry winter cold is taking a toll on my skin and although I’ve been eyeing the Fresh Sugar Lip Polish forever, I haven’t had a chance to make it to the mall (and was too impatient to wait for it to be shipped).  Yesterday, I had an I-need-it-now kind of moment. So, on a whim, I tried my hand at making two scrubs- one for the body and one for the lips all with ingredients in my pantry.  

I’m not typically a DIY beauty type of girl.  But these saved me time, money and are 100% natural which makes me feel great about the end result.  There are a ton of recipes on pinterest, and I’ll link to the ones I used below, but in general, there are some easy formulas to follow.   

Both scrubs are very effective at sloughing away the winter blahs and feel totally indulgent. I consider this little project a  nap time success!
Lip Scrub:
Ingredients:
Mix equal parts sugar (granulated or brown) + honey + coconut oil*.  I also added a dash of bourbon- vanilla (from TJ's) for extra deliciousness. For my little pot I only used about 1 teaspoon each. 

Directions: 
Apply in circular motion to lips for about a minute and then wipe away (I dare you not to eat some). 

Whipped Sugar Body Scrub:
Ingredients:
1/2 cup olive oil
1/2 cup coconut oil*
1 teaspoon of corn starch (optional)
1 cup granulated sugar
essential oil (optional)

Directions:
1) Mix equal parts olive oil + coconut oil in a pan.  Melt over low heat.  Do not let boil. 
2) Pour into a large bowl (I used one that goes to my stand mixer) and then put in freezer for 10 minutes. 
3) Once the edges start to harden, whip the oil on high speed for about 2 minutes.  It will become opaque.  Add cornstarch if desired (it will have a less oily consistency) and continue to whip for another 2-3 minutes. 
4) Once the oil becomes a cool whip-like consistency, gently fold in 1 cup of granulated sugar. 
5) Add essential oils if desired. I added about 10 drops of lavender and 5 drops of ylang-ylang. 

*Quick note on coconut oil. I LOVE coconut oil.  I wrote about it during my first pregnancy here.  My favorite brand is this one

I used two glass containers with lids from emptied beauty products, but you could easily use a mason jar or whatever you have on hand! What tips and tricks do you have for at-home pampering?  I'd love to know! 

Wednesday, February 3, 2016

Guest Post with Christine Bono: Crab Empanadas + Yogurt Sauces

The best thing about blogging is connecting with other mothers and my guest today, Christine, of This Is How I Mom, is one of the sweetest.  I take so much inspiration from her zeal for mothering and the delicious food she prepares for her family.  I'm always ogling  her Instagram posts of the meals  she makes, so  I’m very excited to have Christine here sharing her Crab Empanada recipe- enjoy!

Hello and Happy Wednesday! I'm so thrilled to be sharing a fun new Crab Empanada recipe (with 2 yogurt sauces) I put together this weekend to celebrate my 21 month old son's newfound love of crab and my continued love for empanadas. It was a big hit in my house and I could see it being the perfect Valentine's Day or Superbowl appetizer (or any time appetizer).
Crab Empanada

But first, I'd love to share with you a little about myself. I've always been a huge food lover and have never shied away from testing out a new recipe. I'm a laid back cook who loves whole foods and letting the ingredients shine on their own in any dish I make. I've always been a big believer and lover of the family meal so as soon as my son began eating solid food I began counting down until the day we could all sit at the dinner table and enjoy the same meal together.


My husband and I have never been big celebrators of Valentine's Day so last year we decided to create an extra special 'Valentine's Family Day'. We went to the library, took a long walk, and I got to do my favorite thing: cook a special meal. Looking back now, I think this may have actually been the first time we all sat at the dinner table to eat the exact same meal together, so for me this was a dream come true! It was Julian's first taste of beets and I even threw on a dress because I was feeling extra festive.

Which is why, this year, I want to keep our family Valentines Day tradition going strong. Julian tried crab for the first time on New Years Eve and has been raving about it non stop since then. This gave me the perfect opportunity to try and recreate one of my favorite empanadas from my many trips to Puerto Rico as a kid. Crab, Shrimp, and Lobster empanadas can be purchased at any of the many kiosks that line the beaches there and it was always the ultimate vacation treat: decadent, indulgent, and memorable.
Crab Empanada
Which is what a Valentines Day meal should be: decadent, indulgent and memorable! The crab makes it ultra luxurious and the empanada makes it fun, different, and the biggest bonus is how quick and easy it is to make!
Crab Empanada
Crab Empanadas: (makes 8-10 empanadas)
Ingredients:
1 cup crab meat (claw or lump)
1/2 red pepper, diced
1/4 cup yellow onion, diced
1/4 cup fat free Siggi’s or any plain Greek yogurt (or 3 tbsp softened low fat cream cheese- see below)
1 package empanada shells for the oven
Salt and Pepper to taste

First, a note on buying your crab:

You can purchase your crab in tubs or cans at your local supermarket. I know this may sound crazy but I've used both and I found that the crab I purchased at Trader Joe's from a can was the freshest and lightest tasting crab I've tried outside of cracking them by hand myself. I also bought claw meat since I knew I would be handling it more and when using lump meat you want to manipulate it as little as possible because of how delicate it is. If I were making a crabcake it would be all lump, but in this case we enjoyed the fresh crab taste at a much lower price point, Win, win!

Directions:
1. Remove empanada shells from freezer and set the oven to 400.
2. Cook the peppers and onions over medium heat with a little bit of olive oil for a few minutes to take some of the “raw” flavor out of it. 
3. While the vegetables cook, mix a half-cup of crab with the yogurt or cream cheese. I always use Siggi’s yogurt when I have it on hand because of how thick it is and the very low sugar content, but you can use your favorite plain Greek yogurt as well. 
4. Fold the vegetables into the crab mixture and season as you wish. I used a dash of cayenne, salt, and pepper, but give it a taste and adjust as you see fit. 
5. Place a sheet of parchment paper on a very large baking pan and set a few of the, now somewhat pliable, empanada rounds on top. 
6. Fill the center of each empanada shell with a generous spoonful of the crab mixture and fold over to shut tightly. To close the end tightly you can take a fork and press and press all around the edges, but I like to fold the ends over because they bake prettier and keep closed just as well. 
7. Season with salt and pepper on top of each empanada before putting in oven. 
8. Bake for 15-20 minutes depending on your oven. They are done when they are golden brown on top.

Crab Empanada
The Yogurt Dips:
While the empanadas bake, I like to throw together my 2 “go-to “dips: The always crowd pleasing avocado crema and a chipotle yogurt sauce, for the spice lovers. For the crema, I mix a quarter of a smashed avocado with about ¼ cup of fat free yogurt and season with salt and pepper. For the chipotle yogurt sauce, I mix a generous sprinkle of cayenne pepper with ¼ cup of Greek yogurt, the juice from a quarter of a lemon, and the tiniest drizzle of honey for a spicy but balanced dip.
Crab Empanada
The crab empanadas which were made with the Greek yogurt came out very creamy while the empanadas made from the cream cheese were a lot flakier and the shells came out crispier. Both were equally decadent and satisfying. Julian ate 2 whole empanadas before asking for more. He also loved dipping them into the avocado and Greek yogurt I put on the side. For me, there is no greater pleasure than cooking something with love and having it be enjoyed by the ones I love most. If you make these, please stop by and let me know if you enjoyed them! You can visit me at my blog ( www.thisishowimom.com ) or on Instagram (@thisishowimomdotcom).

This is how I Mom
The biggest thanks and hugs to Megan for letting me share a little bit of my family and my love of cooking with you all! Happy Valentine’s Day!

Monday, February 1, 2016

5 Valentine's Day Activities for Toddlers + Our Favorite Homemade Play Dough Recipe

Is anyone else excited that it's February?!  We've been enjoying some Valentine's Day toddler activities around here lately that I hope you'll like too. I find it fun to incorporate seasonal and holiday themed activities into our play routine.  It helps keeps things new and interesting for both James Robert and myself plus it feels festive.  I love that the toddler stage provides more understanding around what we're doing-- but we're definitely still in the stage that activities need to be quick and easy!

Here are 5 activities for you and your toddler to enjoy that are perfect for Valentines' Day (plus don't miss our play dough recipe at the end of the post):


1) Banner from felt cutouts.  We went to the dollar store and bought felt heart cutouts and then strung them on ribbon we have at home.  It helped him practice his fine motor skills and he was tickled with the result that he were able to display. This could easily be made from felt you have at home already if you do have some.


Wednesday, January 27, 2016

French Beef and Carrot Stew + A trip to the Market


Sometimes I'll choose a recipe based purely on how French it will make me feel while cooking it.  And last week with the cold weather I wanted to make something hearty, warm and satisfying.  So I went in search of a beef stew recipe that would accomplish both my francophile tendencies and palate.  I found the perfect recipe in this French cookbook.

My sister was visiting us last weekend and we used the opportunity to take her to one of our favorite spots in Toronto, St. Lawrence Market.  The markets are indoors at this time of year and are bustling with vendors, musicians and families on a Saturday.  James Robert loves to explore the food as much as we do.

We picked up some local goodies for this recipe and took in the sites.  What's more French than that?


Wednesday, January 20, 2016

Our Favorite Chicken Noodle Soup + Turmeric Broth

I sometimes hesitate to share my recipes here as they are so often a conglomeration of a couple different recipes I read.  My style of cooking leans heavily on my own interpretation and sometimes I can’t remember exactly what I did.  

James Robert has been a bit under the weather, so this past Sunday I made a big batch of chicken noodle soup.  It was heralded as my “best ever”.  So in an effort to remember the recipe and pay it forward, I wanted to share what I did this time around. 

Besides, chicken noodle soup is one of those things that doesn’t need to be to the T.  With endless delicious iterations, I hope you can find this a jumping off point to be tweaked with your favorite embellishments.  

Of note, I have been adding turmeric to the broth for the added immune boosting properties.  I would highly recommend this addition to your next chicken noodle soup as the flavour and benefits have been a fast favorite. 

Everyone has their own desired broth to noodle/chicken ratio.  In my family that can be highly contested, so this recipe is easily adaptable to add more or less of your favorites.  Also, if you want to add more veggies, we’ve done that too with delicious results.  James Robert loves okra, so if we have some, I usually add a few handfuls of that too. 
This recipe easily serves 3-4 for dinner with leftovers for the rest of the week! 

Our Favorite Chicken Noodle Soup:

Ingredients: 
1 Tablespoon Olive Oil
1 Tablespoon Butter
3-4 cloves of garlic chopped
1 small yellow onion chopped (about 1/2 cup)
3-4 carrots chopped
2-3 sticks of celery chopped
Salt and Pepper to taste
Dash of Herbes de Provence

1/4-1/2 Teaspoon Turmeric 
6 cups of vegetable stock (store bought or I like this recipe here)
4-5 big handfuls of your favorite egg noodle
1-2 cups of shredded chicken 
chopped parsley for garnish

Directions:
  1. Poach 2 chicken breasts in boiling water.  Add the chicken breasts to boiling, salted water (I also add a few bay leaves to mine) and let simmer for about 20-25 minutes.  Once cooked, shred the chicken and set aside.  If you have leftovers they are delicious for chicken salad the next day.
  2. In a large heavy-bottom pot, add the butter and oil.  Once warm, add the garlic, onions, a dash of S&P and let saute for about 5 minutes.  Add the carrots and celery and continue to saute for another 5 minutes or so. At this point, I add a dash of Herbes de Provence. 
  3. Add about half the broth (3 cups or so) to cover the veggies and let them simmer until soft or about 15-20 minutes. 
  4. Add the rest of the broth and noodles and let them cook until soft which is about 8 minutes. 
  5. Add the shredded chicken. 
  6. At this point add the turmeric and then taste to adjust seasoning and add more Salt and Pepper as desired. 
  7. Serve with a garnish of parsley and your favorite crackers.