Showing posts with label DIY. Show all posts

Wednesday, February 10, 2016

DIY Sugar Lip Polish + Whipped Sugar Body Scrub

This pregnancy is flying by. I’m astonished that we’re over half way to meeting this baby boy and can hardly contain my excitement.  I’m also relishing every moment of the second trimester while I have energy and feel good! Looking back, my third trimester with James Robert was challenging- I had pregnancy induced arthritis and I generally didn’t feel great.  So this time around, I’m determined to take better care of myself-- a little pampering can go a long way, right?! 
Trouble with pampering is that it usually takes a lot of time and often I'm ready to crash at the end of the day.  But these two recipes proved to be a quick and easy pick-me-up with ample time leftover. 

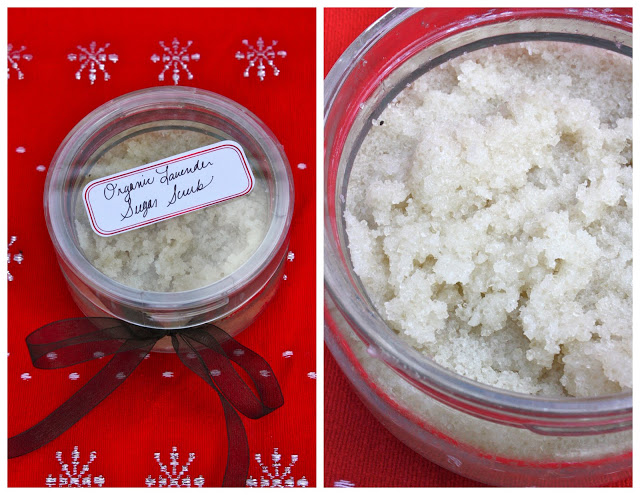
The dry winter cold is taking a toll on my skin and although I’ve been eyeing the Fresh Sugar Lip Polish forever, I haven’t had a chance to make it to the mall (and was too impatient to wait for it to be shipped).  Yesterday, I had an I-need-it-now kind of moment. So, on a whim, I tried my hand at making two scrubs- one for the body and one for the lips all with ingredients in my pantry.  

I’m not typically a DIY beauty type of girl.  But these saved me time, money and are 100% natural which makes me feel great about the end result.  There are a ton of recipes on pinterest, and I’ll link to the ones I used below, but in general, there are some easy formulas to follow.   

Both scrubs are very effective at sloughing away the winter blahs and feel totally indulgent. I consider this little project a  nap time success!
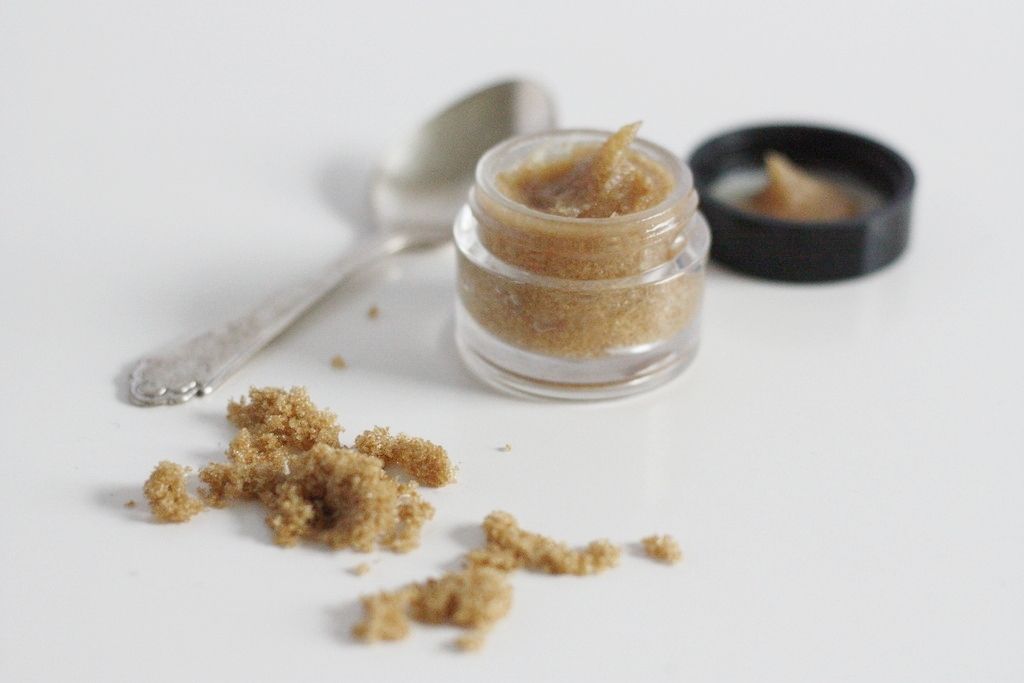
Lip Scrub:
Ingredients:
Mix equal parts sugar (granulated or brown) + honey + coconut oil*.  I also added a dash of bourbon- vanilla (from TJ's) for extra deliciousness. For my little pot I only used about 1 teaspoon each. 

Directions: 
Apply in circular motion to lips for about a minute and then wipe away (I dare you not to eat some). 

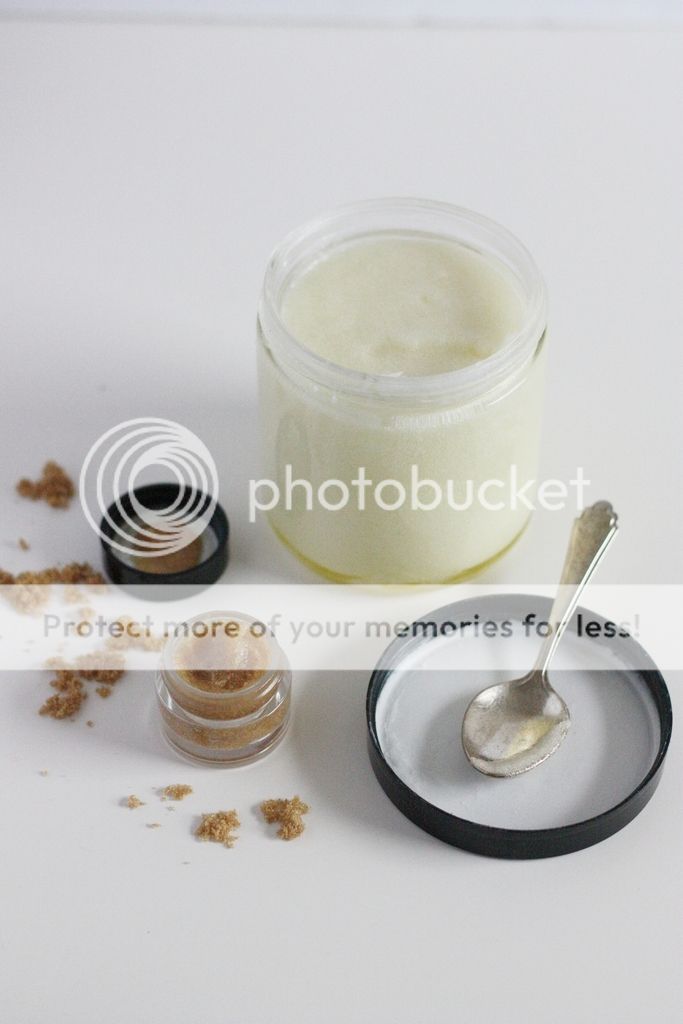
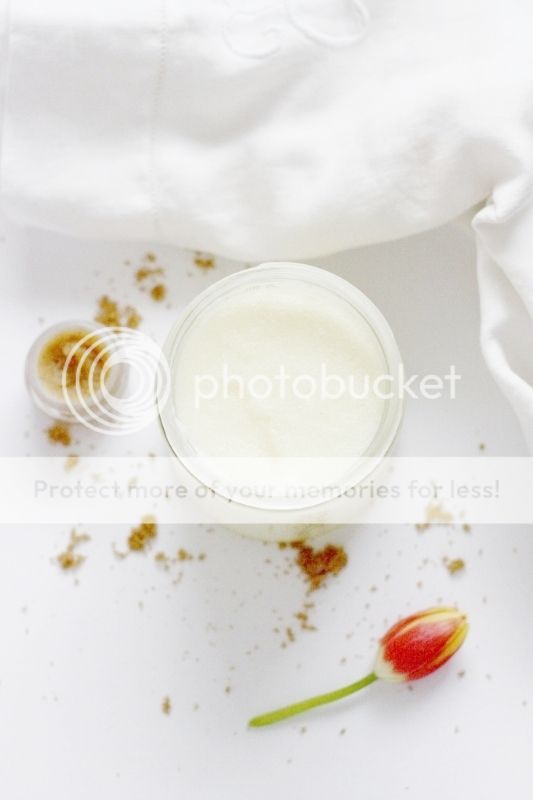
Whipped Sugar Body Scrub:
Ingredients:
1/2 cup olive oil
1/2 cup coconut oil*
1 teaspoon of corn starch (optional)
1 cup granulated sugar
essential oil (optional)

Directions:
1) Mix equal parts olive oil + coconut oil in a pan.  Melt over low heat.  Do not let boil. 
2) Pour into a large bowl (I used one that goes to my stand mixer) and then put in freezer for 10 minutes. 
3) Once the edges start to harden, whip the oil on high speed for about 2 minutes.  It will become opaque.  Add cornstarch if desired (it will have a less oily consistency) and continue to whip for another 2-3 minutes. 
4) Once the oil becomes a cool whip-like consistency, gently fold in 1 cup of granulated sugar. 
5) Add essential oils if desired. I added about 10 drops of lavender and 5 drops of ylang-ylang. 

*Quick note on coconut oil. I LOVE coconut oil.  I wrote about it during my first pregnancy here.  My favorite brand is this one

I used two glass containers with lids from emptied beauty products, but you could easily use a mason jar or whatever you have on hand! What tips and tricks do you have for at-home pampering?  I'd love to know! 

Wednesday, December 21, 2011

DIY Sugar Scrub

It's not too late to make holiday gifts this year! This easy DIY sugar scrub recipe can be done in a flash and is a great, healthy gift to give this season.

Recipe:
1 cup of organic cane sugar
1/3 cup of organic sea salt
1/2 cup organic coconut oil
2-3 tablespoon almond oil
Lavender essential oil {or your favorite scent}- approx 15 drops

Directions:
Mix all ingredients together and adjust the amount of essential oil and almond oil to your preference of texture. Add to your favorite jar, gift and enjoy the ohhs and ahhs.

PS. I got this jar from Hobby Lobby and added a gift tag to the top

Tuesday, November 29, 2011

DIY Magnolia Wreath

I'm going very simple with my Christmas decorations this year. First thing on my list was adding a wreath to our mantle. While I love the look of Magnolia wreaths, I didn't want to spend much, or wait for one to be delivered, so I decided to try my hand at making one. I promise, I'm the last person to tackle a difficult DIY, so I assure you this was easy.


These are the steps I followed:

1) Collect and wash leaves


2) Using a grape leaf wreath form, layer magnolia leaves in co-centric circles until filled. Since patience is not one of my strong suits, I didn't want to bother with the hassle of preserving the leaves. I threw caution to the wind and added fresh cut leaves to a wreath form.


3) A half dozen glue sticks later, I added ribbon and hung her.


All told, I spent about $10 on this DIY and just for fun, here's a comparison.


And since I know you guys like this sort of thing, here's the full room view.

I'll keep you updated on how long she stays green. I'm hoping that even if the color fades, it will end up looking something like this one from Pottery Barn.

Wednesday, July 20, 2011

Cinder Block Garden

{image via}
This DIY planter wall has my wheels turning. The pup is cute too, don't you think?

Tuesday, March 1, 2011

Lavender DIY, part II

Thank you for all your sweet comments on my hurricane project! I learned that many of you share my affinity for the smell of lavender so I thought I would share another easy project that involves it's beautiful scent.
I've blogged about my favorite nighttime routine before, but it's too good to keep to myself so I've been making some as gifts. It's my perfect recipe for sweet dreams- hope you enjoy!

Tuesday, February 22, 2011

DIY Aromatherapy Hurricane Vases

My bedroom needs to be an oasis, in fact, I'm decorating our master to conjure the feeling of being in my favorite place. Its theme decorating in the best way possible- not tacky but more invoking the spirit of a place that makes us feel sublimely relaxed and happy {more on that later when I can reveal the whole thing}.

You have to utilize all five senses when trying to recreate a special place. I have a heightened sense of smell, always have, so one of the first elements that I wanted to bring to our room was the smell of wafting lavender. An aromatherapy session ensued in the creation of our hurricane vases.

Here's what you'll need:
1) Candles, I used fenomen candles {they were the tallest I could find} from Ikea
2) Stick-Um to help the candles stay in place
3) Dried lavender, I ordered 1 lbs online from here
4) Tall cylindrical hurricane vases from Michaels

And here's how they turned out {cue happy dance}. I love smelling them every time I walk by and the natural dusky purple hue they lend to the space is just what I was looking for.

Tuesday, January 18, 2011

When Life Gives You Lemons...

I eluded to a big dead tree in our backyard months ago when we first moved in. And without going into too many details, I'll just say that this thing has been a bear to deal with {aka we didn't see it before closing, this tree has been dead for some time, the previous owners knew it and it leans towards a playground}. It was with a huge sigh of relief that we proclaimed timber this week!


Long ago, we decided that we had to make the best of the situation. Especially with all the things that have been surprises to us since we moved in.

Cozying up to a fire is one of our favorite weekend activities, so we decided to keep the wood. And while we were sorting and chopping this weekend, it dawned on me that we could really turn lemons into lemonade.

Taking inspiration from Pottery Barn and West Elm, I thought, we can do that! {These things sell for upwards of $200+}.
Enter Martha. I knew I could count on her for some DIY tips for this project. Turns our there are lots of clever folk out there that offer advice {try here, here and here}. And since this project will definitely take some time to complete I thought I would leave you with some images of how I hope it will turn out. Fingers crossed!

{decor images via 1, 2, 3, 4, 5, 6}

Wednesday, June 30, 2010

Summer Hair

Do you love the just-out-of-the-ocean styling a la Calypso's lookbook?
I do! And I especially love that look for hair; it's perfect for summer and this Daily Candy video gives step-by-step instruction to the look, sans curling iron.
For summer hair in a bottle, this looks like a great product.
You can also make your own sea-salt spray; recipe here!

Monday, November 16, 2009

Shine A Light

An easy and instantaneous way to shed new light on your surrounding, the lamp kits from National Artcrafts will have you plugging into your creativity.
I love the idea of turning a sentimental bottle of wine into a lamp. It also got me thinking about re-purposing some of our mason jar centerpieces into everyday decor.The ideas are endless and for less than $20 a kit, you can afford to get crafty.

Monday, September 14, 2009

DIY sofa made of shipping palettes

This DIY sofa idea has caught my eye on a few sites, most notably for its versatility and ingenuity. Two wooden palettes and a few power tools later, you've got yourself a unique and inexpensive seating/sleeping option customizable to just about any space. This is upcycling at its finest!

Here is the before:
{image via Apartment Therapy}

And the after:
{image via Elle Interiør }
{image via Walking Around }
{image via casasugar }
For a less shabby chic feel, I like the look of painting the palettes to suit your decor. Depending on the size of your palettes you could fit a twin size mattress, use foam with custom fabric or cover them with floor cushions (urban, world market and le souk all have some cool options).

Monday, August 10, 2009

DIY Ruffly Belt

I've been on a quest to find a belt like J Crew's bouquet sash in grey satin, but was striking out. Then, inspired by Rachel's headband and belt tutorials, I decided to try and create my own. This was the result:
I barely know my way around a needle and thread but had an easy time following the steps for this project- seriously! If you share my affinity for the ruffly and girly look of these, check out the Heart of Light. So easy and cute, I'm thinking these would be the perfect gift- after all, who doesn't love to receive something hand made?

Wednesday, May 6, 2009

What I Wore DIY

Punchy colored tanks are a summer wardrobe staple and I love Jessica's updated version over at What I Wore. Her DIY instructions may be a stretch for non crafty types, like me, but I love that she reused doilies she found at a local flea market. Talk about upcycling!

Friday, March 27, 2009

Crafty aspirations

Oh, to be crafty! It’s a pedigree I’ve long coveted but never come close to attaining. I have a sincere admiration for those who can effortlessly whip up cute creations with the flick of a marker and a piece of string- you know the kind, right?

To be crafty and clever would be handy in my attempts to reduce, reuse and recycle! It seems every day I am tempted by the inspiration around the web to start a project of my own- these ideas are my favorite:

If I was a capable crafter, I would be busy sewing patterns from Built by Wendy .
I would turn thrifted globes into light fixtures.
I’d gift the newest member of our family with a handmade, organic cotton bib.
And then I’d retreat to my immaculately organized craft room to contemplate my next handiwork.

Wednesday, March 18, 2009

Mapping Paper

Directionally challenged, my family relies on a tourist map more than most which means we collected our fair share of maps while traveling in Australia. Ever the environmentalist, my mom came up with a fantastic way to recycle the maps we acquired- turn them into wrapping paper. A travel memento with multiple lives is definitely a step in the right direction!